Page 1
Sometimes your design has to monitor or control something that is more complicated:
- It may need more controls than can fit on a single page.
- The hardware you are controlling or monitoring may have several major sections, each one of which needs a lot of controls.
- Your device may be monitoring sensors at multiple locations, each of which is deserving of an entire page of information and Controls.
TCPmaker Pro can help, by giving you the ability to lay out multi-page layouts, with the ability to easily navigate between these pages, even while testing your layout in a browser before loading your compiled project into a device.
Page 2
The first page, which is the default page that is displayed when you point your browser at your device, is always called the "index" page. If your design only needs a single page, then that single page always has an id = "index".
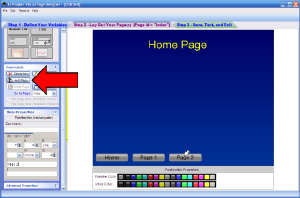
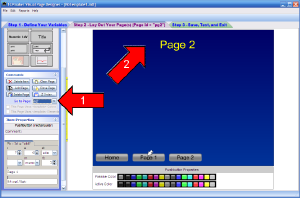
In the screen shot below, we have started to lay out this index page. Since we happen to know right from the start that we are going to need 2 more pages for this design, we start by taking the following steps:
- set the background colors that we want for the Stage area,
- add a title that shows we are on the index page, which we entitle "Home Page",
- add PushButton controls at the bottom, which we will use to switch between pages.
Now we're ready to add a new blank page, so we click the "Add Page" button in the Commands panel.
Click on the image for page view.
Page 3
This has given us a new blank page whose Id is called "pg1" in the "Go to Page:" ComboBox (drop down list) in the Commands panel.
Click on the image for page view.
Page 4
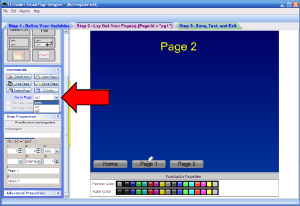
Let's repeat the same tasks that we did on the first page:
- set the background colors that we want for the Stage area,
- add a title that shows we are on the index page, which we entitle "Home Page",
- add PushButton controls at the bottom, which we will use to switch between pages.
We're doing this from memory, so we're trying to match the colors and Control positions that we remember from the index page, as best we can.
Let's also add a command to the g property of the "Home" button on this page, so we can get back to our Home page. This command would be:
g = <index/>
Click on the image for page view.
Page 5
We need to add a similar command to the "Page 1" button on the index page before we can test the navigation of our layout.
To change pages, we select "index" from the drop down list of the "Go to Page:" Combo Box:
Click on the image for page view.
Page 6
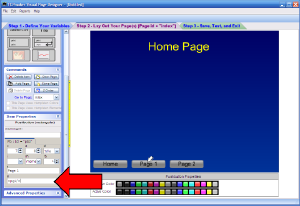
We're back on the Index page, so we select the "Page 1" button, and add a similar navigation command, in HTML format, to this button's g property.
We need to set
g = <pg1/>
Click on the image for page view.
Page 7
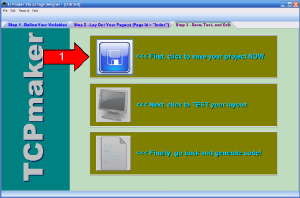
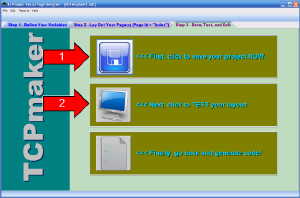
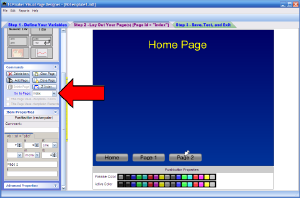
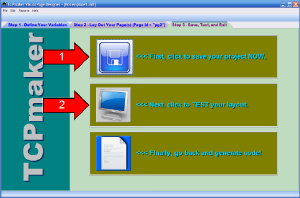
Let's test our navigation at this point. To do that, we need to first go to the tab page labeled "Step 3 - Save, test, and Exit".
Only the top button on this page is enabled at this point, so we click it to save the current layout to a file in our project directory.
Click on the image for page view.
Page 8
You can see from the title bar of the Visual Page Designer that we have saved our layout to file NoTemplate1.mtl. (You'll see in our next tutorial why we gave it that name.)
Once we have saved our layout, the second big button on this page enables, so we can click it to test our multi-page layout in our browser.
Click on the image for page view.
Page 9
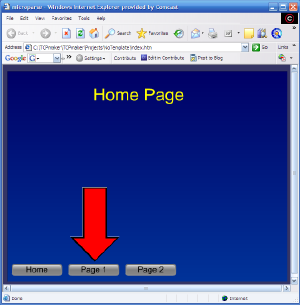
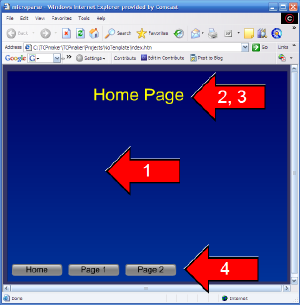
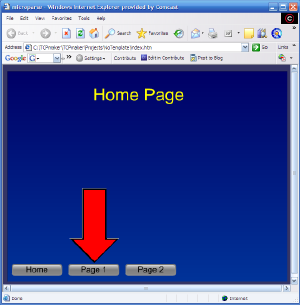
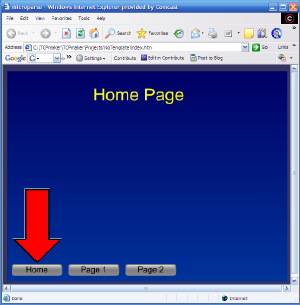
When we clicked the "Test Your Layout" button in the Visual Page Designer, our browser came up and displayed our design -- specifically, our index or "Home Page."
Let's click the "Page 1" button to see if that works...
Click on the image for page view.
Page 10
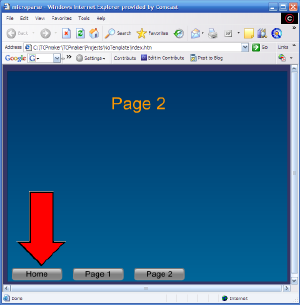
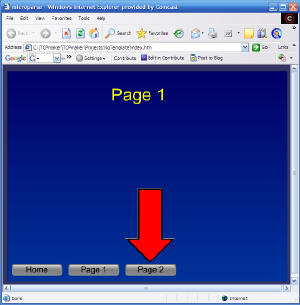
Yep, that worked. Clicking that "Page 1" button on the index page took us to our other page, which is entitled, er, "Page 2", not "Page 1"...
Oops! Gotta fix that title.
Let's click our "Home" button and see if that takes us back to our Index page.
Click on the image for page view.
Page 11
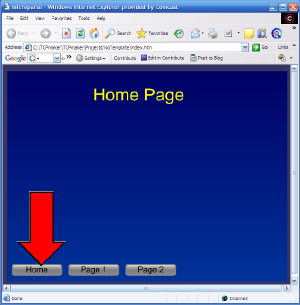
Ah, good, the Home button on our other page worked: we are back at the page entitled "Home Page".
Let's switch back and forth between our pages a few times, just for fun.
Click on the image for page view.
Page 12
By quickly switching back and forth between our two pages, we notice some additional things. These are not operational problems, but they are annoying:
- The background colors on the pages are slightly different
- The colors of the titles of these pages are different: "Home Page" is yellow, but "Page 2" is sort of orange-yellow.
- The positions of the titles on the Stage are different on the two pages, so as we rapidly switch from one page to the next, the title appears to move in addition to showing different text.
- The positions of the buttons are slightly different on the two pages as well, so the buttons appear to move as we switch between pages.
All of these problems happened because we simply weren't careful enough to get things to line up the same on our two pages, nor were we careful to match our colors from one page to the next.
We don't want to give our users a headache from using our device, so we need to go back to the Visual Page Designer to correct these problems. To do that, we just exit the browser.
Click on the image for page view.
Page 13
We got out of the browser, and are now back in the "Step 2" tab page of the Visual Page Designer.
Sure enough, we find that we can use the "Go to Page:" Combo Box to rapidly switch between pages, and we see the same problems with colors and control positioning here as well.
So how do we fix these problems?
Well, the hard way would be to switch back and forth between pages, fixing each button title and color until we got everything to match up just right.
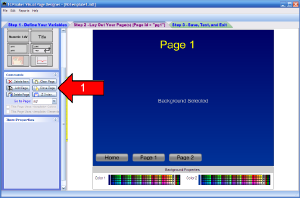
Fortunately, TCPmaker gives us a faster, better way: "Clone Pages." We start by going to pg1 with the "Go to Page:" Combo Box one more time.
Click on the image for page view.
Page 14
The simplest thing is actually to get rid of our pg1 page, and replace it with a clone of our Index page.
To get rid of a page, we first go to that page, and then we click the "Delete Page" button on the Commands panel...
Click on the image for page view.
Page 15
When the Visual Page Designer has deleted our old "pg1" page, it will take us to our index page again. The drop down list in the "Go to Page:" ComboBox shows that this is our only page now.
Click on the image for page view.
Page 16
We are going to clone this page, with all of its colors and all of the controls on the page. This will make an exact copy of the index page and its contents, but with a new Id that is different from "index".
Our strategy will actually be to clone this page twice, to make a new pg1 and a new pg2, after which we will make the changes we want to the titles of these cloned pages.
But we aren't quite ready yet.
Before you clone a page, which is a one-time operation, you want to make sure that the page has everything on it (i.e. Controls and Background Elements) that you will want the cloned page or pages to have, and that all the properties of these items on the page are set up exactly the way you want them to be on your cloned page. That way, you will avoid duplicating the effort of changing these properties on every Control or Background Element on every new cloned page.
Page 17
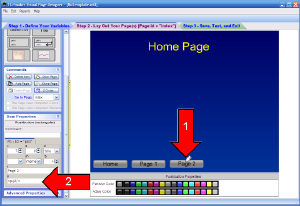
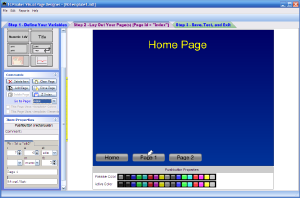
In the case of our simple design, we need to properly set the navigation commands in the three buttons at the bottom of our index page.
The red arrows show that we click on a button ("Page 2" in this case) to select it, and then set the correct navigation command in the button's g property, as shown.
Click on the image for page view.
Page 18
Now we're ready to click the "Clone Page" button in the Commands panel.
When we do, it looks at first as if nothing happened, because the page looks unchanged. Closer inspection shows two ways that we can tell that something DID happen:
- The "Go to Page:" now says we are on a new page pg1
- The caption of the Step 2 page now says [Page id = "pg1"]
Click on the image for page view.
Page 19
We still need one more page, so let's first change the title from "Index Page" to "Page 1" and click the Clone Page button again.
Click on the image for page view.
Page 20
After we clone pg1, we see that we are on a new page pg2.
We change the caption of the title to "Page 2", and now we are ready to test again.
(Even before testing in the browser, we see by using the "Go to Page:" that everything lines up on all 3 pages, and all the colors match now.)
Click on the image for page view.
Page 21
On the Step 3 tab page, even though all the buttons are enabled now, we still need to remember to save our changes, so the browser runs the new layout. So we need to click the save button and the test button.
Click on the image for page view.
Page 22
We're testing our new "cloned" layout in the browser now. Let's see if our Page 1 button works...
Click on the image for page view.
Page 23
Yep, this took us to Page 1, and the colors didn't appear to change, nor did the buttons appear to move around as we went to the new page.
How about Page 2?
Click on the image for page view.
Page 24
Yep, we can get to Page 2.
Can we get back to the Home page?
Click on the image for page view.
Page 25
Yes, we can get back to the Index ("Home") page as well.
Remember that each page has 3 buttons on it, so we really have 9 separate Pushbutton controls in our layout thus far. If you had created each of these pages separately, you would really have to test each button on each page: 9 separate tests.
Because we cloned these buttons, we know the properties of the Home button on each page is identical to those of the Home button on all the other pages: if the navigation command worked on one page, it will work on all pages.
Just for fun, we can try switching randomly from page to page for awhile, before exiting the browser and going back to TCPmaker's Visual Page Designer. Since the colors all match and the controls are all positioned correctly, everything stays rock solid as we move from any page to any other page.
Click on the image for page view.
Page 26
Now that we have our basic pages in good shape, with the navigation between the pages working correctly and with the colors matched and the navigation controls lined up from one page to the next, we can continue with our design.
The next step would be to add, in the center area of each page, the controls that would be different from one page to the next. The controls and background elements you might add to each page would depend on the nature of your project.
The point here is that TCPmaker's Visual Page Designer makes it easy for you make layouts with multiple pages, with simple navigation between these pages. Our powerful "Clone Page" capability can, with some prior planning, save you a lot of time and effort in making these multiple pages consistent with each other, making your project more attractive and professional looking.
In our next tutorial, we'll discuss an even more powerful capabity: TCPmaker's Master Templates.
Click on the image for page view.
|