Page 1
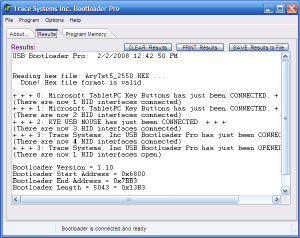
In our last tutorial, we had programmed BLPro_2550.hex into our device, connected our device to the PC, and started BLPro.exe. Then, we changed to the Results page, where we saw something like this:
Click on the image for page view.
Page 2
The information in the Results box shows that BLPro.exe has automatically read in the target hex file that we specified in the configuration file BL.ini, so it is ready to go.
It shows all the USB HID class devices that are connected to the PC, but our BLPro.exe only opened the one device that it is designed to open: the one device that contains and is running our bootloader, BLPro_2550.hex.
The display also shows that our BLPro.exe on the PC has automatically requested the Bootloader version information, which is equivalent to clicking Program | Get Bootloader Version.
Click on the image for page view.
Page 3
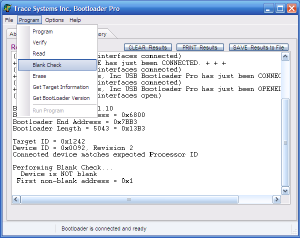
We saw in our last tutorial that the default Options menu settings of USB Bootloader Pro are sufficient that we could simply click the Program button, but let's explore the separate options we might want to use in a development situation.
Program | Get Target Information determines whether the PIC processor in the connected device is the one we are expecting. (It is.)
Click on the image for page view.
Page 4
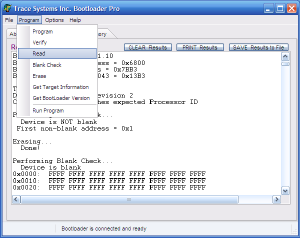
Lets click Program | Blank Check and see if our device is blank. It is not.
NOTE: If you have just used a device programmer to program BLPro_2550.hex into (the high part of) the PIC processor's Flash program memory, you may be surprised that BLPro.exe tells you that your device is not blank: you would expect the target area of program memory to be blank at this point.
This is almost true, but the bottom 3 words of program memory at this point contain a branch to the bootloader up in high memory, so our Blank check **fails**: our device is not quite blank, and our device will need to be erased before re-programming.
Click on the image for page view.
Page 5
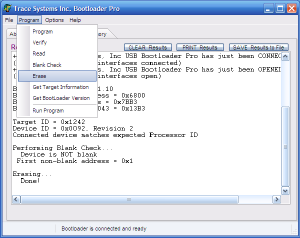
So, let's click Program | Erase to erase the target area of the PIC processor's Flash program memory.
Click on the image for page view.
Page 6
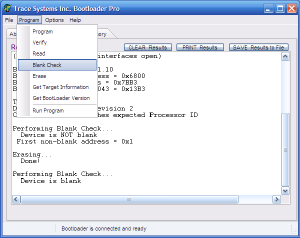
If we repeat the Blank Check, we now see that we pass the test. The device is now officially blank in the target area, and is ready to be re-programmed with BLPro.
Click on the image for page view.
Page 7
Just to confirm this, let us click Program | Read to read (and display on the PC program) the contents of the target area of the PIC processor's Flash program memory.
From the Bootloader version information, we see that the target area extends from address 0x0000 up to just below the Bootloader Start Address, which would be 0x67FF in this case.
We can see that the bottom of program memory (including those first 3 words) are all 0xFFFF which means "blank".
Click on the image for page view.
Page 8
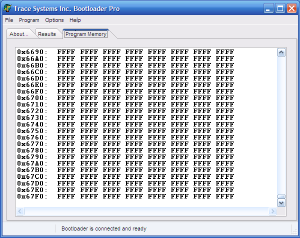
If we switch to the Program Memory page and scroll down to the bottom, we see that the Flash program memory is indeed blank all the way up to address 0x67FF, which is just below the start of our bootloader.
Click on the image for page view.
Page 9
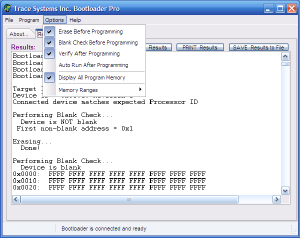
To continue our walkthrough of individual steps in a development environment, we need to drop down the Options menu and un-check "Auto Run After Programming."
Click on the image for page view.
Page 10
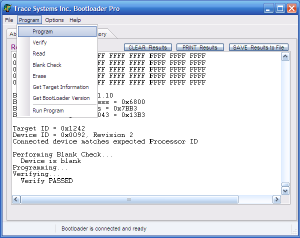
With the other options still checked, let's scroll down to the bottom of the Results box and click Program | Program.
BLPro goes through several steps, because of the options we kept checked:
- It did another blank check.
- It programmed the device.
- It verified that the programming results were correct.
Since the programming and verifying steps can take a few seconds, it showed a progress bar for each of these steps.
Click on the image for page view.
Page 11
Now we are ready to have the bootloader in the device turn over control to the new code we just programmed into the target area of the device.
When we do that, the bootloader will stop running and thus effectively disappear, and the PC program will act as if the device has been disconnected.
Let's click the "Run Program" menu item and watch how it happens.
Click on the image for page view.
Page 12
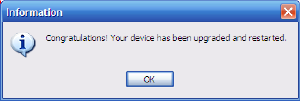
You may hear a few beeps from your computer as the switchover happens, and you will see that a message box comes up to tell you that the process has completed successfully.
Click OK on the message box.
Click on the image for page view.
Page 13
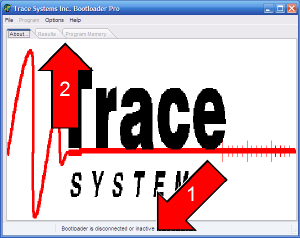
Because the device no longer has the bootloader actually running in it, our BLPro.exe program displays "Bootloader is disconnected or inactive" on its status bar, and the Results tab, Program Memory tab, and Program menu become disabled and greyed out.
(The bootloader is still in your device, it just isn't running right now.)
What is running in your device right now is the firmware program you just loaded and ran. So, your device has changed its identity as far as the PC is concerned.
Click on the image for page view.
Page 14
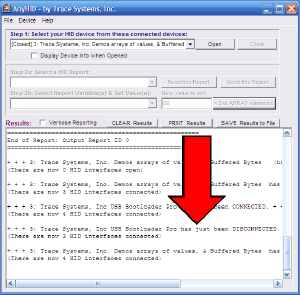
The firmware we loaded into our device is a HIDmaker USB project, so we can look at it and run it with HIDmaker's AnyHID tool.
AnyHID shows what happened:
- A device called "USB Bootloader Pro" electrically disconnected itself from the PC, and
- A different device called "Demos arrays of values, & Buffered Bytes" connected itself in place of the other device.
Our device is up and running with its new, upgraded firmware!
Click on the image for page view.
|